Charcuterie boards are like a trendy art form with food as the medium. Anything goes! However, if you’re new to charcuterie board styling, knowing the basic ground rules will help you relax, so you let your creative juices flow. The best thing about these appetizer boards is that you can be so flexible. Portions adjust up or down to suit how many guests you’ll be having and if you have any guests with special dietary needs, the menu is also easy to adjust. You can even apply a unique theme to your boards – we’ve heard of some people shopping for foods of the same color or focusing on foods that come from a specific part of the world. There are just so many ways to create eye-pleasing and delicious charcuterie boards.
In this blog post, we want to show you some easy but elegant cheese arrangements to make your board a real showpiece. But, first, let’s go over the basic steps to putting together a charcuterie board to wow your guests.
Step One
Choose your board! With its unique veining pattern, a marble tray will add elegance to your family gatherings and parties. Marble is naturally cool, retaining a low temperature that makes it ideal for serving cheese, fruit, and cured meats. At INOX Artisans, we have artisan charcuterie boards in different shapes and sizes. Sourced and crafted in a neighboring region of the Taj Mahal, our marble trays and boards come in various shapes and sizes.

For a unique charcuterie board, wood and marble combinations are also beautiful. Crafted from acacia wood and white marble, our wood and marble boards are beautifully creative home décor items when not in use.
When serving friends and family, we like to use round charcuterie boards with handles. It’s like a dressy pair of pants with the bonus of pockets! The handles make it convenient to pick up your newly loaded appetizer tray from the kitchen and move it to another area where you will be serving guests. During the summer, round charcuterie boards with handles are ideal for serving guests on the patio or deck. Once the food on the board is gone, it becomes a handy service tray for transporting dishes and other items back to the kitchen.
For a grazing table, you might want to add a mix of marble trays and wood boards for charcuterie. If you’d rather not use boards at all, you can cover the table with butcher paper, so that bread, crackers, nuts, and dried fruit can go directly on the table.
Step Two
Cut the cheese. We’ll talk about this more, but keep in mind that you’ll want to keep your pre-cut cheeses in the fridge until you place them on the board. When serving your cheese and appetizers, bring everything to room temperature.
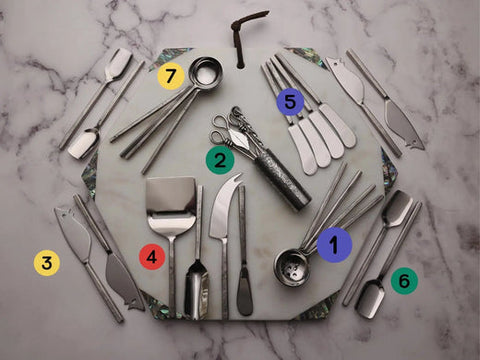
There are different schools of thought on whether the cheese should be sliced and arranged or left as whole blocks on the board. While there is no right or wrong way of serving cheese on your charcuterie boards, when left whole it’s important to provide a cheese knife set with the proper knives for each different type of cheese. Each cheese block should have a knife, so there is no transfer of flavors. We’ve heard the argument that when left whole, guests don’t tend to eat and enjoy the cheese. One way around that is to “start” the block with a few cut pieces and the correct knife near or directly on top of the cheese block. For tips on which cheese knives to provide your guests, check out our blog article, called Cheese Knives – A Cheese Lover’s Guide.

Jason Cheese Tools 4 Pc. Set
Step Three
You might think the next step is to add food to your charcuterie boards, but adding structure comes first. Place little dishes at different spots on the board to create the layout of the board. These little dishes will hold dips, spreads, and other foods that you won’t want to pile on the board, such as stuffed olives, cornichons, or berries.
Step Four
Now that your structure is set up, begin placing your food around the little dishes, starting with the larger elements, like cheeses and meats. It’s perfectly ok for foods to touch on your charcuterie boards, but try and leave some space for guests to scoop or pick up their choices.
Hint: Arrange meat so it is easy to grab with a fork or tongs. Fold thin slices of prosciutto like an accordion or roll them into logs. Salami placed on the board like little shingles on a roof is both attractive and easy to grab.
Step Five
Add crackers and bread. Stack crackers loosely and don’t be afraid of a cracker “mess”. It’s all part of the charm of an artful charcuterie board. Have a cheese spreader knife on the board for spreading butter or hummus and other creamy spreads on crackers and bread.
Step Six
Time to add your fruits and veggies! Grapes on the vine are an obvious choice for charcuterie boards but don’t rule out other fruits like oranges, pears, and pineapple. For veggies, you can include cherry tomatoes, carrots, and bell peppers to name a few.
Step Seven
Time to fill in all those gaps. Dried fruits like apricots, dates, and figs are great fillers as well as nuts like almonds, pecans, cashews, and pistachios. Garnish your charcuterie boards with herb sprigs like thyme, rosemary, and basil.
Unlock Your Cheese Styling Creativity
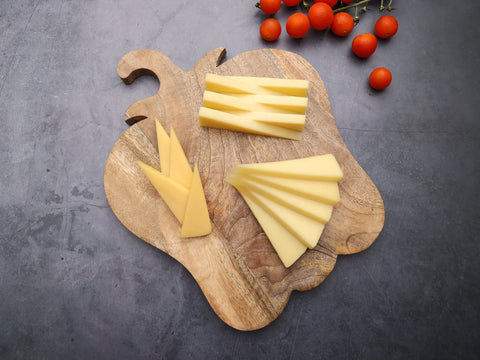
Once you see how easy it is to arrange cheese slices creatively as part of your charcuterie presentation, you’ll look forward to adding this new art form to your boards.
We used Smoked Gouda and Gruyere cut into triangles to make these stylish arrangements.
The Braid

Stack semi-soft cheese triangles (we used smoked Gouda) into a braid or plait shape to add depth to your cheese boards.
The Fan

This fan stack of semi-hard Gruyere looks like a spiral staircase. Lean the stack on a bowl or other structure to hold its shape. This is a perfect example of how a simple arrangement can have such a big impact on your cheese boards.
The Zipper

A cheese board favorite, this Gruyere zipper arrangement consists of triangles placed in alternating directions. Eye-pleasing on its own or for Holiday charcuterie boards, you could add dried cranberries or candied nuts in the center. Either way, it is easy for guests to pluck a slice to enjoy!
Here are all three styles:

...and all three styles on a charcuterie board with handles:

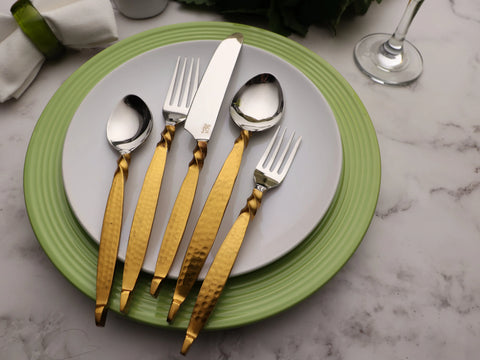
Charcuterie boards with handles are ideal for transporting your appetizers from room to room. The Aria scorched wood serving tray with handles adds a rustic touch to your indoor or outdoor gatherings. Shown here with the Twisted Urban Gold Cheese Knife Set.
Charcuterie Boards Etiquette
Finally, it wouldn’t be a blog about charcuterie boards without a few words on guest etiquette. Just like there are few must-follow rules when creating your best charcuterie boards, our do’s and don’ts list is short and very easy to remember:
Do use the spoons provided for dips and sauces. Spoon some dip onto your plate to use as you wish.
Don’t take things directly from the board and eat them. Use the tools provided by your host to place the things you want on your plate. After use, return forks, knives, and spoons to the same space on the board.

Cocktail picks and skewers are fun additions to cheese and appetizer boards, so if provided feel free to skewer a few items together for a tasty mini kebab or two.
We hope you’ve enjoyed these charcuterie board and cheese styling tips.